Spotting a gas or fuel leak from a carburetor is a sight that no go-kart racer likes to see. While a leaking carburetor is relatively rare compared to other things that can go wrong with your go-kart, it’s something that you should definitely fix immediately. In this guide, I’ll be teaching you how to fix a go-kart carburetor that is leaking gas.
You’ll notice the gas flowing into the intake manifold or out of your carburetor. There are five common reasons for a go-kart carburetor leaking gas and you can repair it by fixing a stuck carburetor float, unclogging the jets, repairing the broken carburetor float bowl gasket, or fixing a loose or torn gas line connection.
Leaving your carburetor in a leaking state can cause further damage down the road and will also likely lead to erratic idling, delayed starting, stalling and even poor fuel economy.
How Does a Go-Kart Carburetor Work
Before we go through the potential issues that may affect your carburetor and how to fix them, it’s important that you understand how a go-kart carburetor works and what the internal components are. If you’re already familiar with this topic, feel free to skip to the next section of this guide.
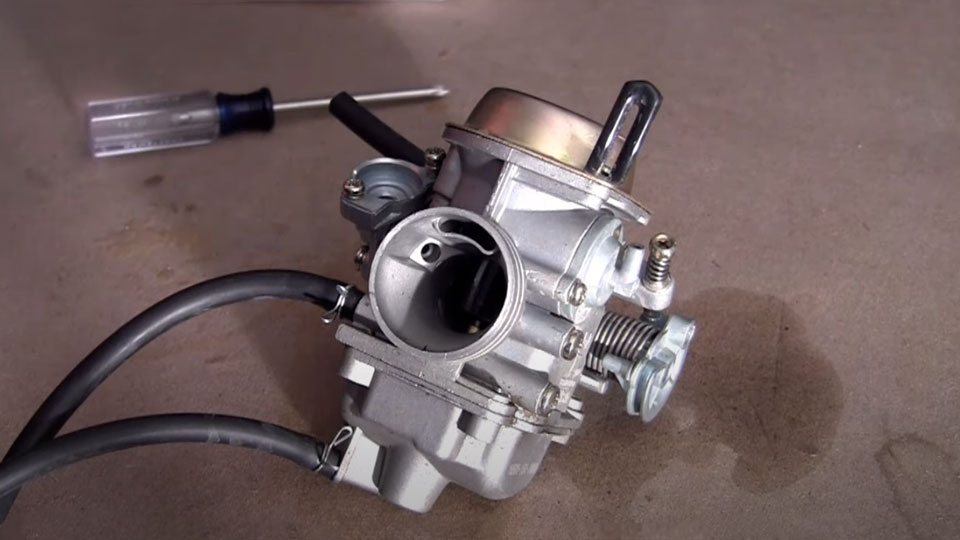
A go-kart carburetor or carb is a mechanical device that is attached to the engine and mixes air and fuel into an optimal ratio before it’s pumped into the engine. It takes in filtered air from one valve and fuel from the other, in order to mix it.
An optimally configured carburetor will not only increase the engine performance but also increase your fuel economy. This mechanical device consists of several components that you need to be aware of, so that you’ll know which parts it may be affecting and need to be cleaned or replaced when fixing it.
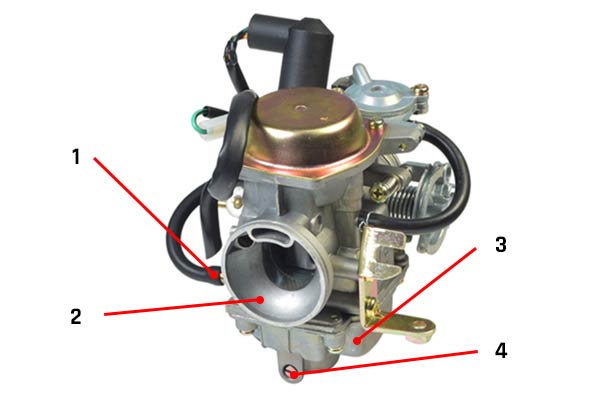
Parts You’ll Need to Know
- Fuel Inlet (fuel into carb)
- Air Intake (air into carb)
- Float Bowl
- Float Bowl Drain Screw
List of Potential Carburetor Gas Leak Issues
Now that you understand how a carburetor works and what the most important parts are, it’s time to look at the potential issues for gas leak and how to fix them.
1. Stuck Carburetor Float
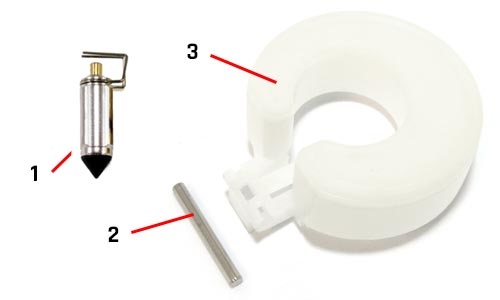
Relevant Parts
- Float Valve Needle
- Float Pin
- Float
A stuck carburetor float is by far the most common reason why a carburetor can leak gas. While it mostly causes a delayed engine start or an engine stall, it can also lead to fuel leaks. When you open the go-kart carburetor and detach the float bowl, you’ll see that the float doesn’t move up or down easily.
If that’s the case, then your carburetor float is stuck and you’ll need to clean the entire carburetor and possibly replace the float valve needle. The float valve needle is located on top of the float valve and enables the float to move up and down. If the needle is stuck, that also means that the float won’t be able to move.
Thoroughly cleaning the carburetor float, float valve needle and float pin should allow the float to move freely again. If that isn’t the case, then you’ll need to see which of the three parts is defective and replace it accordingly.
There are a few things that you’ll need to check and do, in order to fix a stuck carburetor float. Below is a step-by-step guide for this.
Steps to fix a stuck float:
- Remove the carburetor from your go-kart
- Remove the float bowl from the carburetor
- Test if the float is stuck or obstructed
- Remove the float pin
- Remove the float
- Remove the float valve needle
- Thoroughly clean float, float pin and float valve needle
- Rebuild lower section of carburetor and test float mechanism
- Reassemble the carburetor
2. Clogged Carburetor Jet
Another common issue that can cause a go-kart carburetor to leak gas is a clogged jet. There are two jets that you need to be aware of. After detaching the carburetor and opening it, you’ll be able to spot both of the jets easily.
The location of the main jet is inside the float bowl. It’s the larger of the two jets and is responsible for supplying the carburetor with the required fuel. You’ll be able to identify them easily as their made of brass. The main jets kick in when the throttle is activated (60 – 100% range).
The other jet is called the pilot jet and has the same function but activates when idling. You’ll need to make sure that both jets are not obstructed or clogged. You’ll need to remove them. Give both of the brass jets a thorough clean in an ultrasonic cleaner with a cleaner solution or vinegar. If you find that the jets are no longer good for use, then simply replace them.
Steps to fix clogged carburetor Jets:
- Remove the carburetor from your go-kart
- Remove the float bowl from the carburetor
- Remove the pilot and main jet
- Thoroughly clean jets and remove dirt and debris
- Test if jets are unclogged
- Reassemble pilot and main jet
- Reassemble the carburetor
- More Information: How to Clean a Go-Kart Carburetor (Step-by-Step Guide)
3. Broken Carburetor Float Bowl Gasket
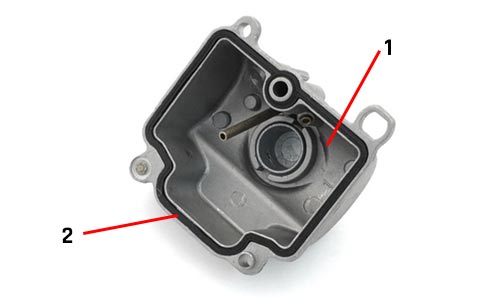
Relevant Parts
- Float Bowl
- Float Bowl Gasket
When you detach the float bowl from the carburetor, you’ll notice that there is a gasket or an o-ring wedged in between the two components. The float bowl gasket acts as a sealant, which prevents air or fuel to escape from the carburetor. There are many gaskets on a carburetor, but the most common gasket that can break is between the float bowl and carburetor.
Due to wear and tear, the float bowl gasket can break or crack making it no longer airtight. This means that gas may seep out the sides. You’ll be able to notice this if you see that the carburetor is leaking gas from the side, where the float bowl connects to the carburetor.
Unfortunately, once a float bowl gasket is broken it can’t be fixed. The good news is that you can simply replace it with a new one, as they’re very affordable and easy to slot in.
Steps to fix a broken carburetor float bowl gasket:
- Remove the carburetor from your go-kart
- Remove the float bowl from the carburetor
- Remove the float bowl gasket
- Insert the new float bowl gasket
- Reassemble the carburetor
4. Loose Fuel Line Connection
Relevant Parts
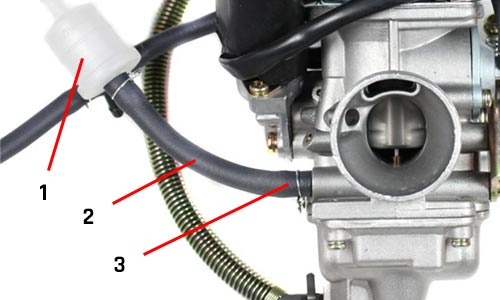
- Fuel Filter
- Fuel Line
- Fuel Inlet
The first place you should look at if you have a gas leak are the fuel lines that are running into the carburetor. Regular wear can cause certain connections to loosen on the carburetor and the first point you should inspect is the fuel inlet.
The fuel line is connected to the fuel inlet of the carburetor, as it transports the fuel from the fuel tank into the carburetor. The fuel line is connected to the fuel inlet via a clamp. If the clamp comes loose you can sometimes see gas leaking out of the fuel line onto the carburetor. While it may look like the leak is coming from the carburetor, it may actually come from a loose fuel line connection instead.
If the clamp is worn, replace it with a new one. They are relatively inexpensive and can easily be replaced. If the clamp has eaten into the fuel line and the end of the fuel line is damaged, you can cut the damaged piece off or replace the fuel line entirely.
Steps to fix a loose fuel line connection
- Inspect the fuel line connection
- If the fuel line is loose, remove fuel line clamp
- If the clamp is damaged, replace it with a new one
- If the fuel line is damaged, cut off or replace it entirely
- Reattached the fuel line to fuel inlet on the carburetor
5. Torn Gas Line
A torn fuel line can also cause the fuel to seep on to the carburetor, making it seem like the leak is from the carburetor itself. If you see that the leak it’s coming from the carburetor, check the fuel lines from the fuel tank into the fuel filter and the fuel line from the fuel filter to the fuel inlet on the carburetor.
A tear in one of the fuel lines will be obvious and you’ll need to fix this by simply disconnecting the fuel line and replacing it with a new one. This should be a quick fix and will only take you a few minutes.
Steps to fix a torn fuel line
- Inspect the fuel line between the fuel tank and fuel filter
- Inspect the fuel line between the fuel filter and the fuel inlet
- Remove the damaged fuel line
- Replace it with a new fuel line
Great information. I have a Coleman kt196 with a hisun engine. It literally has less than 2 hours ride time since bought new December 5th 2020. Found that the gasket between carb and engine leaks gas when the engine is running. I checked the carb and gaskets. Can’t seem to find the issue that’s causing it to leak. Has a warranty for 2years but I don’t know what I need. New carb and gasket maybe? However I thought when the gasket between carb and engine leaks it sucks in air but doesn’t leak gas? Thoughts on that? My kids wanna ride it but it’s a fire hazard so trying to get it fixed asap. Thank you.
Thanks for that!
Sounds like a broken gasket (unless it’s using an o-ring), but it’s hard to assess from here. It could also be on the carburetor neck (if you have one installed) Did you manage to dismantle and inspect the carburetor?
Make sure that you don’t void the warranty if you plan to have it exchanged.