Honda engines are equipped with a recoil starter by default, which means that you’ll have to use the pull cord, in order to start the engine. However, there’s a much better and more convenient way, by using an electric starter.
To achieve this, you’ll need a Honda engine electric start kit, which is installed by connecting a charging coil and a compatible flywheel to the Honda engine. This allows you to turn on the engine through simply turning a key, instead of having to use a traditional pull cord.
This is a perfect solution for Honda engines for go-karts or any other vehicles and tools, such as leaf blowers and lawn mowers. Here are the topics that I will cover in this guide:
I’ve created a guide that is easy to understand, on how to get the electric start kit installed on your Honda engine. You can follow the step-by-step instructions below or use the guide that comes with your electric start kit.
1. Honda Electric Start Kit Review
Electric start kits for Honda engines are a great way to make the engine start up process a lot more convenient by replacing the traditional recoil starter with a charging coil. Let’s take a closer look at the two different types of kits.
Electric Start Kit for
Honda GX160 & GX200

Key features:
- Suitable for GX160 & GX200
- Comes with Ignition Box & Keys
- Charging Coil Included
Electric Start Kit for
Honda GX340 & GX390

Key features:
- Suitable for GX340 & GX390
- Comes with Ignition Box & Keys
- Charging Coil Included
There are various electric start conversion kits available for Honda engines and I’ve featured the best two versions above. Take note that the first electric start kit is compatible with the Honda GX160 and Honda GX200 engine.
The other electric start kit is compatible with the Honda GX340 and Honda GX390 engine. It’s important to get the right one, as Honda engines come in different sizes. If you purchase the wrong size, you won’t be able to install the charging coil and flywheel.
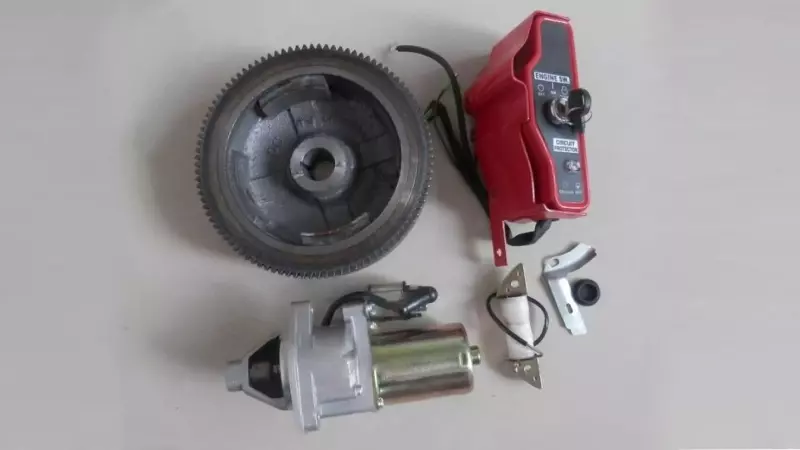
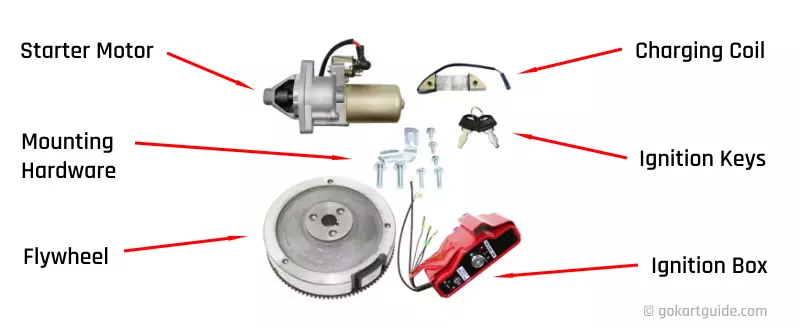
What’s included in the electric start kit:
- Starter Motor
- Ignition Box
- Ignition Keys
- Flywheel
- Charging Coil
- Mounting Hardware
- Recoil Cover (Optional)
2. Installation Guide
In order to install the electric start kit for your go-kart’s Honda engine, you’ll need to follow the guide below. Ensure that you have enough workspace and a compatible impact wrench to remove and mount the hardware.
Step 1: Remove the Recoil Starter Cap
In order for you to access the interior of your Honda engine, you’ll need to remove the recoil starter cap. Simply use an impact wrench to loosen the bolts that mount the cover onto the engine.
Once the bolts are loose, remove them along with the cover. You’ll now have access to the flywheel and the flywheel fan.
Step 2: Remove the Flywheel and Flywheel Fan
You’ll now see a nut that holds the flywheel along with its other components in place. Take an impact wrench and remove the nut. After that you can remove the metal brace, the white-colored plastic flywheel fan and the flywheel.
Step 3: Install the Charging Coil
Once the flywheel is removed you’ll see four mounts on each corner, top left, top right, bottom left and bottom right. The ideal location to install the charging coil is on the top left and top right mounting positions.
Place the charging coil on the mounts of your Honda engine. The charging wires should be facing to the right side. Use the mounting hardware that came with the kit and secure the bolts tightly.
Step 4: Install the New Flywheel and Flywheel Fan
Now that the charging coil is in position, install the new flywheel from the kit. After the flywheel is in place, install the flywheel fan, followed by the metal brace and the nut that secures all components tightly.
Step 5: Install the Recoil Starter Cap and Starter Motor
You’ll now need to install the starter motor to the right side of the Honda engine. You will notice that the electric start kit comes with the appropriate mounting hardware.
Once the starter motor is installed, proceed to place the recoil starter cap back in place using the bolts that you had previously removed.
Step 6: Mount the Ignition Box and Connect Wiring
Now place the ignition box to the right side of the Honda engine and mount it in place. Once that is complete, you can proceed to the final step.
Lastly, you’ll need to connect the wiring. From the ignition box, connect the following:
- One wire to the oil alert box
- One wire to the charging coil
- One to the starter relay (positive +)
- One to the negative point (negative -)
Make sure that you get the polarity right. The positive connector (+) should go where the positive wire of your go-kart battery hooked up to. The same should go for the negative (-) connector, which should be on the engine. If you accidentally swap the polarities, you’ll blow the ignition box, so please be careful.
3. Buyer’s Guide
Before deciding on an electric start kit for your Honda engine, you may want to familiarize yourself with more information. The following section is a buyer’s guide that aims to discuss various compatibility and the contents of these start kits.
Compatibility
Arguably the most important thing you’ll need to make sure of is compatibility. Honda engines come in various sizes, depending on the series. Therefore, you’ll need to ensure that you get an electric starter kit that fits your engine.
Here is a list of all GX Honda engines that are the same size. This means that the flywheel is compatible across a particular series. For example, the Honda GX340 and GX390 use the same starter kits, as the engines are the same size.
- GX120, GX160 & GX200
- GX240 & GX270
- GX340 & GX390
Kit Contents
Most electric start kits for Honda engines should include a starter motor, an ignition box, an ignition key, a flywheel, a charging coil and mounting hardware. There are also kits that come with an additional recoil cover and sets that only feature the charging coil.
In that case, you’ll need to either source for a compatible flywheel or ensure that your existing flywheel is suitable. Before purchasing, ensure that you go through all of the included components on the product page.
4. Frequently Asked Questions
I’ve compiled some of the most frequently asked questions on the installation guide and the products that are featured.
How Long Does It Take to Install an Electric Start Kit on a Honda Engine?
That depends on how experienced you are and how much you understand the components of your Honda engine. If it’s the first time installing something on your engine, expect it to take between 30 – 60 minutes.
If you’re more experienced, you’ll be able to complete the installation in about 15 – 20 minutes.
What Tools Do I Need to Install a Start Kit on a Honda Engine?
You won’t require many tools in order to install the electric starter kit. You need an impact wrench that is compatible with Honda engine bolts and the mounting hardware of the electric start kit. You may need a rubber mallet to loosen the flywheel if it’s stuck.