From time to time, go-kart components may stop working. This can happen, due to regular wear and tear or though excessive use, regardless if you have a homemade or racing go-kart. Although go-karts are not as complex as other racing vehicles, they require maintenance and repair, so that they can run optimally.
A brake system is one of the most important components in a go-kart, as it is the only mechanism in which your go-kart is able to reduce speed in a short period of time. Under certain circumstances, go-kart brakes can fail and you won’t be able to brake efficiently or even at all. That’s why it’s best to check your brakes before racing, so that you can see if your go-kart brakes are not working. There are a variety of go-kart brake systems and each one has its own advantages. In this guide, I’ll be teaching you a few effective methods on fixing go-kart brakes that are not working.
Different Types of Go-Kart Brakes and What Could Be Broken
In this guide, we’ll be focusing on the three most common types of brakes that are used in go-karts, which are band brakes, drum brakes and disc brakes. For a quick overview, take a look at the table below that illustrates some of their differences and some of the potential causes for not working properly.
Band Brakes
Type: Mechanical
Cause 1: Worn Brake Band
Cause 2: Worn Cable
Drum Brakes
Type: Mechanical
Cause 1: Worn Brake Cable
Cause 2: Damaged Parts
Cause 3: Rust or Corrosion
Drum Brakes
Type: Hydraulic
Cause 1: Hydraulic Issues
Cause 2: Air Buildup
Cause 3: Worn Brake Pads
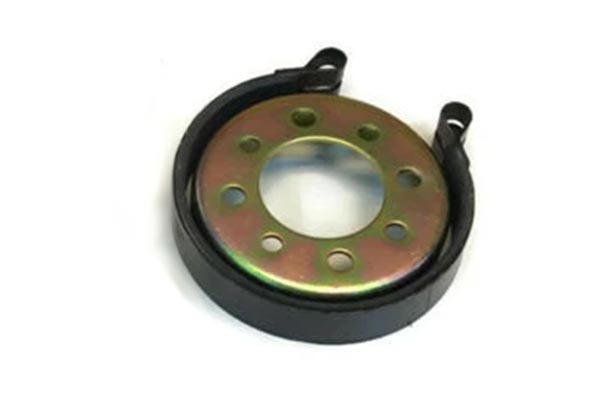
1. How to Fix Go-Kart Band Brakes
Homemade and custom go-karts, as well as some smaller off-road go-karts use a band brakes. They work by a brake band that constricts around a brake drum, which is initiated by a brake cable that is connected to a brake pedal. The friction that is generated by the constriction of the brake band slows the go-kart down.
The design of a brake band system is relatively simple, however they can also fail. The most common issues with brake band systems are that either the brake band itself or the braking cables wear out. Either of these two issues are easy to spot and also easy to fix. Let me run you through how to fix both issues.
1.1 Worn out Brake Band
A worn out brake band will cause spongy brakes, which you will most likely notice over time. You’ll be able to spot gradual deterioration in braking performance. In other words, if you brake and you feel very little resistance there is a high chance that the brake band has worn out.
In addition to that, you can also spot a worn brake band by inspecting its physical appearance. You’ll spot that the brake band is loose and that the band itself looks worn out. It may not necessarily have tears, but you can see that it’s elongated.
Fixing a Worn out Brake Band
The best thing to do here is to simply replace the worn out brake band with a new one. Brake bands tend to wear out due to the friction between the band and the drum. Simply replace the brake band with a new one of the same size and you’re good to go. I’ve also created a guide on how to measure brake bands, if you’re unsure.
1.2 Worn out Brake Cable
Another common issue that bands brakes face is a worn brake cable. A brake cable consists of an inner cable and an outer casting. Over time and excessive use, the brake cable can elongate. When you push the brakes on your go-kart, you’ll feel less resistance due to the reduced tension of the brake cable, which causes the brake band to not fully constrict.
You’ll also be able to spot a worn brake cable by just looking at it. The brake cable will appear to be loose and not tightly tensioned. You won’t have this problem if you’re using a brake rod instead of a cable.
Fixing a Worn Out Brake Cable
You can simply replace the worn brake band with a new one or install a brake rod instead. Both components are easy to replace or install and will fix this issue immediately
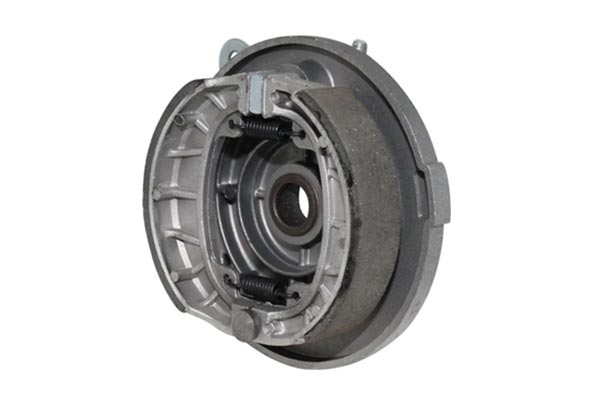
2. How to Fix Go-Kart Drum Brakes
Drum brakes are not as common but can be found on some off-road go-karts and homemade go-karts. You can think of drum brakes working in an inverted way compared to brake bands. When the brake cable applies tension, the brake shoes in the drum brake push outward. This causes friction and the go-kart slows down.
Drum brakes are slightly more complex than brake bands, as they contain more parts. If your drum brakes aren’t working you will need to remove your wheels, in order to diagnose the issue. Let’s take a look at the most common issues that go-kart drum brakes face.
2.1 Worn out Brake Cable
Most go-kart drum brakes use a cable and a lever to push the brake shoes outward, compared to a hydraulic system with a cylinder. The first thing you should check is the brake cable. If you see that there is minimal tension, then you will need to replace it immediately. Brake cables wear over time and you’ll start noticing a gradual decrease of braking effectiveness.
Fixing a Worn Out Brake Cable
Similar to replacing the brake cable on a band brake system, simply swap out the cables for a new one. If a worn brake cable is the cause of it, then this should immediately enable your drums brakes to function properly.
2.2 Dislodged or Damaged Parts
Drum brakes are designed to last quite a bit longer than disc brakes and brake bands. The interior parts of a drum brake will generally last very long. However, over a longer period of time or through heavy usage some of the brake components may become dislodged or even damaged. Common components in the drum brake that you should look out for are the brake shoes, anchor pins and return springs. These parts have a tendency to either damage or get loose.
If you’re using a hydraulic drum brake, you should also check the cylinder that may need to be replaced. If you see that it’s leaking, it needs to be replaced. Mechanical drum brakes don’t have a cylinder, but rather a cam that presses the shoes against the drum. These can sometimes be bent or even broke so ensure to check this, too.
Fixing Dislodged or Damaged Parts
In order to fix damaged or dislodged components within the drum brake, you’ll firstly need to remove the wheel and the wheel hub, in order to get access. Once you get a good viewing angle on the interior, check each component to see if they are dislodged. If you spot any parts that have come loose, put them back into position. If you spot that there are some damaged components, simply note down which part it is and replace them accordingly.
2.3 Rust or Corrosion
If you have been using your drum brake for a long time, it’s quite possible that the internal components are stuck, due to rust or corrosion. Even though some metals have an extremely high resistance to rust and corrosion, contact with water and air can cause metal degradation over a long period of time.
When that happens, the inner components of the drum aren’t able to function properly and the brake shoe won’t be able to move. You’ll be able to hear a rusty drum brake, as it usually makes a squealing or squeaking noise. It’s easy to spot rust or corrosion by simply opening the drum brake.
Fixing Rust and Corrosion
The first thing you’ll need to do is remove the wheel, in order to get access to your drum brakes. Once you open it, you‘ll be able to see the rust deposits. If the rust is preventing the brake shoe from moving properly, you can use WD-40 to remove light rust. If the entire interior is covered in rust, you should disassemble all components and place them into a container filled with WD-40 Rust Remover Soak.
Any form of WD-40 works great, as it breaks the bond between the metal and the rust. After the rust has been removed, you can then reassemble the brakes. If your brakes are too heavily damaged by corrosion or rust, it’s better to completely replace the drum brakes. You’ll most likely find a replacement, depending on your setup and drum brakes. They are also relatively inexpensive.
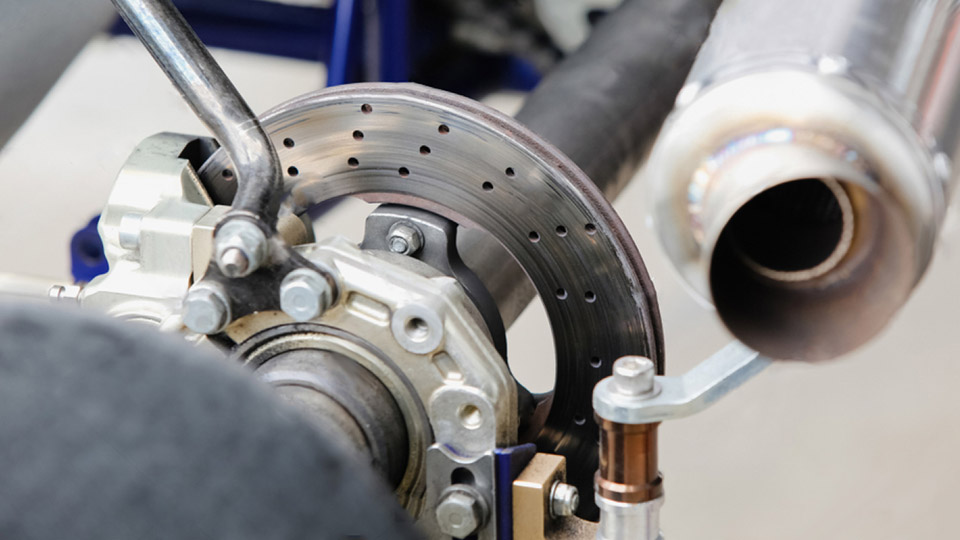
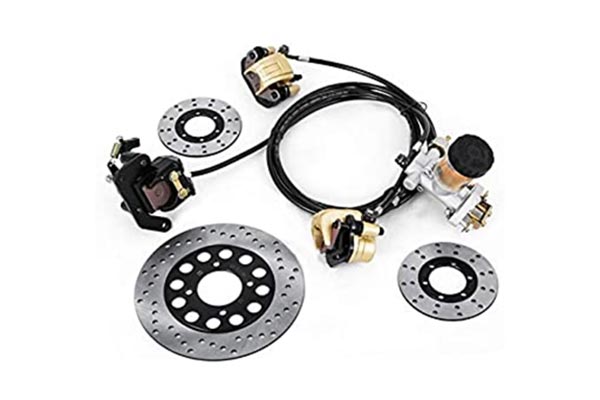
3. How to Fix Go-Kart Disc Brakes
Disc brakes are considered the most effective brake system for go-karts. This is because they have great stopping power, which is ideal for high speed. Therefore, you see disc brakes on almost every racing go-kart.
A disc brake system works by two brake pads camping onto the brake disc, generating friction. The clamping motion is created by pressing the brake pedal, which is connected to the brake via a hydraulic system. This system features a reservoir and hoses that contain hydraulic fluid, which allows you to operate the brakes. Let’s take a look at some of the most common issues with go-kart disc brakes and how to fix them.
3.1 Air Buildup in Brake Lines
If your go-kart brakes are not working, you may want to check for any hydraulic-related issues. One of the most common issues with hydraulic brakes on go-karts are air bubbles that form in the hydraulic brake lines. In order for go-kart disc brakes to function properly, hydraulic pressure needs to be distributed evenly. Air within the brake lines will cause the brake to feel spongy or not responsive.
Fixing Air Buildup in Brake Lines
In order to fix your go-kart brakes, you’ll need to bleed them. Bleeding go-kart brakes refers to releasing the air bubbles within the brake lines, in order to fill them with brake fluid. There are many ways to bleed brakes and the fastest way is to step on the brake pedal a couple of times and leave it pressed, while removing the bleeder valve cap, which will release the air. Close the cap and repeat this step a few times. You may need someone to help you with this, as the brake pedal and bleeder valve are on opposite ends of the kart.
3.2 Worn Brake Pads
Another common issue of disc brakes not working properly are worn brake pads. If you hear a screeching or squealing noise while stepping on the brakes, chances are that you need a new pair of brake pads. They’re fairly easy to replace and you should be checking your brake pad wear every time you do your regular maintenance. Different kart manufacturers recommend different thicknesses before a change of brake pads is required. Generally speaking, you should ensure that you have at least 3mm of thickness on each of the brake pads.
Fixing Worn Brake Pads
Fixing brake pads on a go-kart is relatively simple. You should see two caliper mounting bolts, which you need to detach. After that you need to remove the brake caliper and depress the brake piston, which will allow you to remove the two used brake pads. Replace them with a new pair and proceed to reassemble the brakes.
I need to find spring-loaded brakes on a go-kart
My go kart brakes are stuck, and the go kart runs slow. How do I fix it?
Hi William,
Inspect your brakes to see which parts are stuck. You may need to replace parts of it or the entire set, depending on what type of brakes you have.
My new go kart brakes are squealing how do I fix this problem.
Hi Lance,
You can try applying a thin layer of brake grease to the contact points of your brake.
Brake just moves back and fort can’t get=any pressure in pedal
Hi, try bleeding your brakes.
I just installed new hydraulic brakes on my off-road go kart and I have to push the brake pedal really hard for them to engage. I’ve bled them and they work it jus takes alot of foot power even bending the pedal a little for them to work. What could be the issue?
Hi Doug,
I would check the fluid levels in your master cylinder and if the linkage rods are set up correctly (they may be too loose).
I cant seem to get the pistons to compress. Ive bled the brakes. Any solutions?