
Many people are unfamiliar with the fact that you can actually adjust a torque converter so that it delivers more torque. So, how do you adjust a torque converter on a go-kart? The short answer is that you’ll need to adjust the spring on the torque converter by moving it to one of the pre-drilled and numbered holes.
As you know, a torque converter is a Continuous Variable Transmission (CVT) and it’s able to automatically adjust the gear ratio between the driven pulley and the jackshaft, depending on the engine’s rpm. Even though a torque converter can deliver different levels of torque at different rpm ranges, you’re still able to adjust it.
In this guide, I’ll go through a step-by-step process on how to adjust a go-kart torque converter so that you can follow along. We’ll then go through some of the reasons why you should adjust your go-karts torque converters and also explore the answers to some common questions.
Parts That You’ll Need to Understand Beforehand

Part Descriptions
- Movable Face with Cam
- Fixed Cam
- Spring
- Adjustment Holes
In the image above you’ll see that on the driven pulley, there are several components attached to it. There is a movable face with a cam, which is attached to the fixed cam. The tension between the face and the cam is caused by the red spring in between. The end of the spring is set to an adjustment hole numbered with 1. The default hole that your spring is set to is 1.
Adjusting your Torque Converter in 4 Easy Steps
Below you’ll be able to find a 4-step process for adjusting the spring on your torque converter. Please bear in mind to always be careful when disassembling and reassembling your torque converter.
Step 1 – Remove the Nut, Snap Ring, Cam and Spring
In order to adjust your torque converter, you must get access to the spring. Firstly, you’ll need to remove the nut and the snap ring that is located on the fixed cam. After you have removed the snap ring and the nut, proceed to remove the fixed cam and the spring from the torque converter. Leave the rest in place as it is. You also won’t be required to remove the chain or belt when adjusting your torque converter.
You’re also able to remove the nut, snap ring, cam and spring while your go kart is stationary on the floor. It’s recommended to work on go-karts while it’s on a stand, as they provide you with better access to components. However, a go-kart stand is not required for this process.
Step 2 – Adjust the Spring
Now that you have removed the nut, snap ring, cam and spring, you can start to adjust the spring setting on the torque converter. If you take a look at the image above, point 4 indicates the torque converter adjustment holes. You’ll usually find three pre-drilled holes where the end of the spring can slot into. By default, it will be in slot number 1.
The next step is where the actual adjustment happens. You can detach the spring from the fixed cam and place the end of the spring into a different numbered hole. The holes are marked as 1, 2 and 3. The higher the number you place the spring into, the more torque your go-kart torque converter will produce.
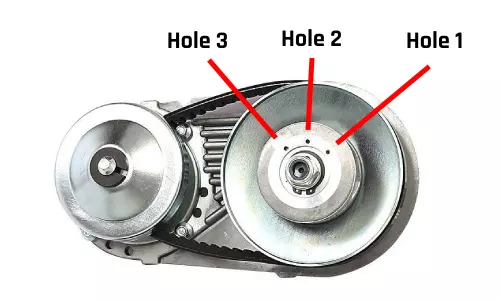
If your torque converter doesn’t come with hole labels, then you may use this illustration for further reference. With all of the holes pointing up, the sequence is in reverse order: Hole 3 (left), Hole 2 (middle) and Hole 1 (right).
You can refer to this section, where I explain more details on how changing the holes will actually affect the amount of torque that is being produced. You can also use different types of springs with different weights – click here for more information on that.
For a quick insight, you can use the reference below:
- Hole 1: For flat roads (Normal Torque)
- Hole 2: For inclined or uneven roads (More Torque)
- Hole 3: For off-road usage (High Torque)
Step 3 – Reassemble the Nut, Snap Ring, Cam and Spring
Now that you have decided which setting to adjust your torque converter to, it’s time to reassemble the fixed cam with the spring. The reassembly of the parts is simple and straightforward. Simply, place the parts back onto the torque converter in reverse order.
Firstly, place the spring back with the fixed cam back against the torque converter. Ensure that the end of the spring is inserted into the hole of the torque converter, just as it is on the fixed cam. You’ll see that the fixed cam has two flat sides in the hole, so ensure that they are aligned when you slot it back in. Here it gets a little tricky, keep pressing it fully in and go to the next step.
Step 4 – Preload the Spring and Assemble the Snap Ring and Nut
You’ll now need to preload the torque converter. This is done by turning the fixed cam that you are holding against the torque converter in a counterclockwise direction until it hits stop. You’ll have to do all this, while pressing the fixed cam against the torque converter.
While still pressing, take the snap ring and place it back on. This holds the fixed cam in place and the spring of the torque converter is preloaded. Now all you have to do is to screw in the nut. That’s it!
What Does Adjusting the Spring Actually Do?
When you adjust the torque converter you’re actually moving the end of the spring into a different hole. What this does is tighten the tension on the spring. The tighter the tension on the spring, the more torque your torque converter is able to deliver.
However, you should be mindful that more torque also means more wear on the components. You should take that into consideration when adjusting your go-kart torque converter.
Can I Drill More Holes Myself?
Yes, you can actually drill a fourth hole if you require more torque. However, please be reminded that the more torque your torque converter produces, the more wear it will experience at the same time.
Some torque converters don’t contain any adjustment holes. In this case, you can drill some yourself. I recommend about half an inch gap between the holes and the hole diameter should equal that of the spring end, in order to ensure a perfect fit.
If your torque converter already has pre-drilled holes and you want to add another one, make sure you use equal gaps and the exact same hole diameter. You can also change the spring type (usually they come in different colors) in order to adjust the torque converter output.
What Are the Different Spring & Weight Combinations
Go-kart torque converters work with a weight-spring system, which determines at what speed (rpm) the clutch will start to engage. Therefore, the right combination will allow you to fine tune the ratio you need.
Below is an engagement chart for 20 & 30 Series torque converters. You’ll be able to customize the engagement by decreasing and increasing the weight. Increasing the weight will reduce the engagement rpm and vice versa.
| Spring Color | Zinc Weights (320g) | Aluminum Die Cast (146.8g) | Mod Aluminum (90g) |
|---|---|---|---|
| Black | 1,400 rpm | 2,100 rpm | 2,300 rpm |
| Orange | 1,500 rpm | 2,300 rpm | 2,500 rpm |
| Pink | 1,800 rpm | 2,800 rpm | 3,100 rpm |
| Blue | 2,200 rpm | 3,300 rpm | 3,700 rpm |
| White | 3,100 rpm | 4,000 rpm | 4,500 rpm |
| Yellow | 3,300 rpm | 4,200 rpm | 4,700 rpm |
| Blue | 3,600 rpm | 4,600 rpm | 5,300 rpm |
| Silver | 3,600 rpm | 4,600 rpm | 5,300 rpm |
Conclusion
As you can see, adjusting a torque converter on go-karts is simple and straightforward. You’ll only have to familiarize yourself with all the parts in order and understand the sequence of disassembling and reassembling your torque converter.
The general rule is, the more tension there is on the spring (higher number on the hole) means the more torque that your torque converter is going to output. Always keep in mind that more torque also means more stress on the components.
If you need a visual guide on this you can check out this video, to see this process step-by-step. Thanks for reading and happy adjusting!
This for an outboard driven? Newer ones come like this but many Carter bros came inboard..
Hi,
How do you stop the belt from coming out past the end of the pulley on the drive clutch at full RPM?
Why doesn’t my torque converter not let the go cart be pushed in reverse? Also the go kart wants to take off as
Soon as the engine starts? Any tips will help
I have put a 224 predator on my kids go kart, originally I put a regular clutch on and it burnt up in minutes as this is an off road cart. So I bought a torque converter and it seemed to work perfectly but the belt burnt up after several rides. What might have caused the belt issue and can I solve the issue by adjusting the spring?
belt keeps jamming in the bottom of driven(bigger wheel on jack shaft)and locking up the tires? How to fix? I have a 2 seater side by side(big go-kart) with a Duromax 20HP 500cc Engine with a 40 series torque converter. Please help, anthony whitehurst