Torque converters are a common type of transmission found on go-karts, particularly off-road go-karts. As with many other components, torque converters have certain wear and tear parts.
One of the most common components that needs to be replaced on a torque converter is the belt. As it connects both pulleys, the drive belt needs to be properly maintained and also needs to be the right size. Installing a belt on torque converter is easy and straightforward.
Here are the 3 easy steps to put a belt on a go-kart:
- Remove the Driver Pulley Nut and Cover
- Place the Belt Onto the Pulleys
- Reattach the Driver Pulley Cover and Nut
The steps above are relatively easy to follow. However, before you start installing or replacing the belt on your torque converter, ensure that you have the right tools.
Here is a quick list of the things you’ll need:
- 1/2-Inch Wrench or Socket
- Compatible Belt
Important Parts of the Torque Converter
Before starting the process of installing a torque converter belt, it’s important to familiarize yourself with all relevant components first.
Important Parts:
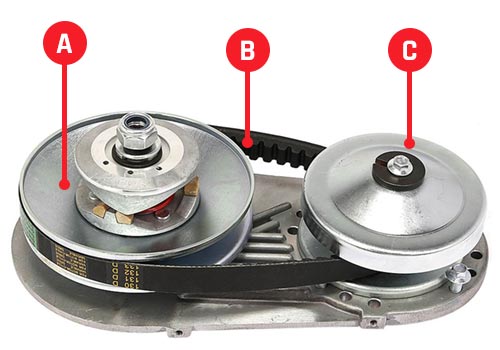
- A: Driven Pulley
- B: Belt
- C: Driver Pulley
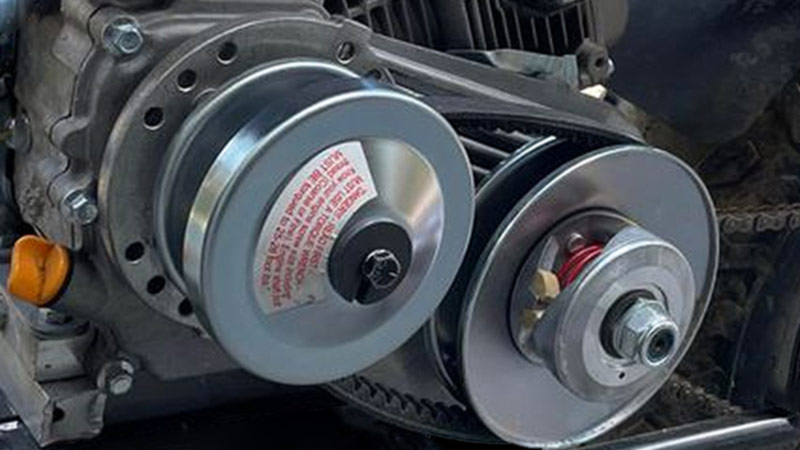
In the illustration above, you can see that the (C) driver pulley is connected to the driven pulley (A) via a belt – also known as a drive belt (B). Each pulley is held in place with a nut and bolt.
For easy reference, the driver pulley is typically the smaller of the two and is connected directly to the crankshaft of the engine. It rotates together with the crankshaft. On the other hand, the driven pulley is located further away from the crankshaft and is usually the larger pulley.
Tip: You can easily identify the driven pulley, as it contains a spring (typically red).
1. Remove the Driver Pulley Nut and Cover
The first thing you’ll need to do is remove the nut on the driver pulley. You can do this by using either a 1/2-inch wrench or a socket. Simply loosen the nut and twist it off.
Once the nut comes off, you’ll also be able to remove the bolt, washer, driver pulley cover, driver pulley and sheave. If you already have an existing belt on your torque converter, you’ll be able to see it on the driver pulley side, while the driven pulley still remains intact.

Important Steps:
- A: Remove nut, bolt and washer
- B: Remove cover, driver pulley and sheave
- C: Don’t remove any parts of the driven pulley
You may use the illustration above to locate the components on the drive pulley. It’s important to note that you won’t need to remove the driven pulley at all. In fact, simply leave it in place.
2. Place the Belt Onto the Pulleys
If you are replacing an existing belt on your go-kart’s torque converter, then you’ll need to remove it first, before putting on a new one. Simply slide it off the driver pulley bushing.
You may need to exert a little bit of pressure on the bushing so it doesn’t come off when you remove the belt. Once you slide the belt off you’ll also be able to remove it from the driven pulley.
You’ll now need to place the new belt on the torque converter of your go-kart. If you don’t have an existing belt installed, your process will start here. Simply place the new belt around the driven pulley first, which is intact.
If you have an asymmetrical belt, ensure that the flat side is always facing the engine and the angled side is facing outward. For symmetrical belts, you won’t need to check this.
Then, increase tension on the belt and ease it around the driver pulley bushing. Since the driver pulley clutch and cover are removed, this step should be fairly easy to do.
3. Reattach the Driver Pulley Cover and Bolt
Now that your belt is in place, ensure that it has the right amount of tension and that it’s the right size. You may check the go-kart belt size chart for more information on compatible belts for your torque converter.
You are now tasked to reinstall the bolt, washer, driver pulley cover, driver pulley and sheave in the reverse order, as you have initially removed them. Simply slide on the sheave, followed by the driver pulley, the cover, as well as the bolt and nut.
Once you tighten the nut, you’ve completed the entire process. It’s much simpler than it actually sounds! Well done!
Frequently Asked Questions
Some people have written in and asked some questions about installing a belt on a go-kart. I’ve compiled the most common questions and made the answers available below.
How Long Does It Take to Change a Go-Kart Belt
Installing a new belt on a torque converter takes about 5 – 10 minutes, depending on your skill level. If you are more experienced, you’ll be able to do this in just a couple of minutes.
For people who are doing this for the first time, you’ll still be able to do this fairly quickly but will probably spend more time identifying the part locations.
Where Do I Find the Right Belt?
You should always replace your existing belt or install a new belt that is compatible with your torque converter. One way to do this is to check the belt size chart for a compatible option, or refer to the owner’s manual.
You can also read my separate guide on measuring go-kart belts for more information.