Knowing how to clean a go-kart carburetor is important, as it should be part of your regular maintenance schedule. A carburetor that is cleaned and properly maintained allows it to mix the air-to-fuel ratio optimally, which in turn increases your racing performance.
There are several other reasons why the carburetor on your go-kart needs to be cleaned. A carburetor can be leaking fuel or even become clogged after extensive use. In order the clean the carburetor, here’s what you’ll need:
- Screwdriver
- Cloth
- Carb Cleaner (I use Gumout Carb Cleaner)
In this guide, we’ll be taking a look at the entire carburetor cleaning process. I’ll be showing you how to remove the carb from your go-kart and also which parts to clean and what to clean it with. Let’s jump right in!
1. Remove the Carburetor From Your Go-Kart
The first step is to remove the go-kart carburetor from your go-kart. While you can clean parts of your carburetor while it’s still mounted onto your kart, you’ll need to remove it eventually once you get to the internal components. Therefore, it’s best to remove it immediately.
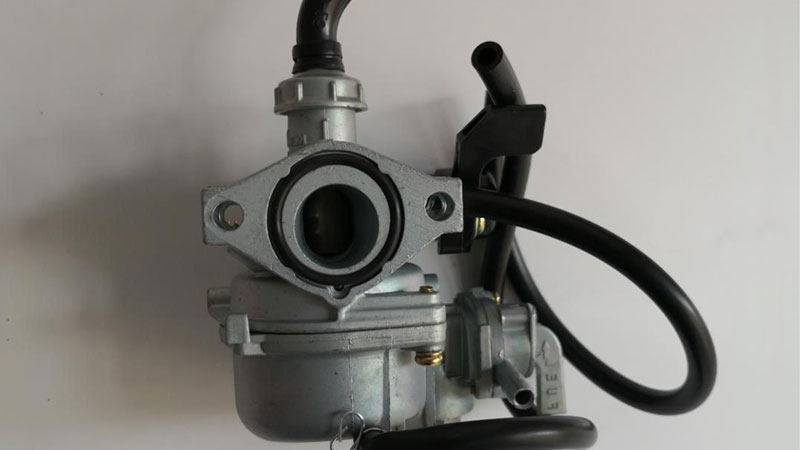
Ensure that the engine is switched off and that you can easily access the carburetor. You’ll need to remove the fuel line from the fuel inlet, the intake manifold, and the fuel outlet that goes into the engine.
Keep in mind that it’s common for small amounts of fuel to spill out of the fuel lines. It’s best to place a cloth underneath when removing them.
Depending on the type of engine, the carburetor may be located inside the engine housing. In that case, refer to the engine owner’s manual on removing the carburetor.
In summary, remember to remove these components:
- Fuel lines (from inlet and outlet)
- Intake Manifold (connected to the air filter)
- Engine housing (if applicable)
- Gaskets and spacers
2. Disassemble the Carburetor
After you’ve removed the carburetor from the engine of your go-karts it’s time to disassemble it. Before your start the disassembling process, dust off and clean the exterior with a cloth, brush or an air spray.
Parts to Disassemble:
- Remove Float Bowl
- Remove Float Needle
- Remove Float Pin
- Remove Float
- Remove Remove Main Jet
- Remove Pilot Jet
- Remove Fuel Screw
- Remove Choke
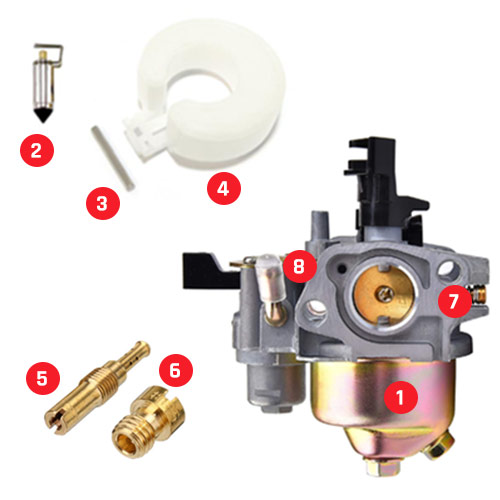
Next, you’ll need to start removing the float bowl. After the float bowl has been detached, you’ll need to remove the float needle, the float pin and the float itself. All three components are held together by a screw (Items 1, 2, 3 and 4).
Then, carefully remove the pilot and the main jet from the top part of the carburetor (items 5 and 6). Lastly, you’ll need to remove the fuel screw (7) and the choke (8).
Since the fuel screw is set in a particular position, it’s best to remember how many turns it takes to remove it. You’ll need this for the reassembly later on.
3. Clean All Carburetor Parts
Now that you have removed all the internal components of the carburetor that need to be cleaned, the real fun can begin! It’s best to lay out all of the components on a table. You should have the carburetor, float bowl, float needle, float pin, float, main jet, pilot jet, fuel screw and choke.
When it comes to cleaning the internal components of a carburetor, you’ll have the choice between using a cloth, brush and a carburetor cleaner. You can get any type of carburetor cleaner (I use the Gumout Carb and Choke Cleaner – 14 oz).
Here’s a guide on how to clean all of the parts that you removed in the previous step. Lay them out one-by-one on a cloth and proceed to clean them individually.
Cleaning the Float Bowl of the Carburetor
The first item that you’ll need to clean is the float bowl. Remove the rubber gasket and wash it with a cloth, so that it’s free of any debris.
The float bowl itself should be cleaned with a carb cleaner. You should apply the cleaner onto the inside and outside surface of the float bowl. Ensure that both surfaces are sprayed equally, then proceed to wide it off with a cloth.
If you’re not using a carb cleaner, you can also use a cloth or an air spray to get rid of any debris and unwanted particles.
Remember to:
- Spray both inside and outside of float bowl
- Use a cloth to wipe it dry
Cleaning the Float, Float Pin and Float Needle of the Carburetor
You can clean the float, float pin and float needle at the same time. You don’t need to apply any carb cleaner here. Instead, simply use an air spray or a cloth to spray or wipe these components down.
Remember to:
- Use an air spray or cloth to clean all three components
Cleaning the Main Jet and Pilot Jet of the Carburetor
The main and pilot jet are components that are prone to get clogged. It’s therefore extremely important to clean them thoroughly. As the openings of these jets are very small you won’t be able to use a cloth.
Instead, use a carb cleaner and apply it on the outside of the jet, as well as the inside. Now use an air spray and point the straw into the larger opening of the jet. This will ensure that all of the carb cleaner is removed.
Make sure that you inspect both jets before and after cleaning, so that you can ensure that they’re in perfect condition before placing them back into the carburetor.
Remember to:
- Clean the inside and outside of both jets
- Inspect jets carefully before and after cleaning
Cleaning the Fuel Screw of the Carburetor
The fuel screw is very easy to clean. Simply apply the right amount of carb cleaner onto the screw. Subsequently, wipe the remaining product off using a cloth. If you’re not using a carb cleaner, you can use any type of cloth for this.
Cleaning the Choke of the Carburetor
Cleaning the choke is also easy and is a similar process as the fuel screw. Simply apply enough carb spray, ensure that you’ve got all parts covered before wiping it off with a cloth.
Cleaning the Carburetor Itself
The rest of the carburetor will have several intakes, inlets and valves. When it comes to cleaning the carburetor itself, you want to make sure that all interior and exterior areas are free of debris. It’s best to use a carb cleaner and a cloth for this.
For smaller components such as valves and inlets, it’s best to use an air spray. Make sure that you thoroughly inspect the inlets, as any clogging could cause potential issues.
Lastly, wipe down the entire carburetor with a cloth and inspect it carefully.
4. Reassemble and Reinstall the Carburetor
Great Job! You’ve successfully cleaned all of the important components of the go-kart carburetor and it’s now time to reassemble it. Simply follow the same steps as you did for disassembling your carb, this time only in reverse.
Firstly, start by screwing in the choke (8) and the fuel screw (7). Then slot the pilot jet (6) and the main jet (5) into position. Reinstall the float itself, float needle and float pin (2, 3, 4). Lastly mount the float bowl back into place, ensuring that the rubber gasket is also present.
Once you’ve done that, it’s time to reinstall your carb onto your go-kart. Place all the gaskets and spacers before mounting the carb. Reconnect the fuel lines (inlet and outlet), as well as the air filter through the intake manifold.
If you have a go-kart engine with a housing, ensure that you place it back in exactly the same way you took it off and ensure that it’s secured tightly.
5. Clean All Related Parts (Optional)
Cleaning a go-kart carb should be part of your regular maintenance schedule. Learning how to clean a go-kart carburetor is important, as it can often become clogged or dirty, which can cause performance issues.
That being said, there are also other types of parts that should be cleaned that are connected to the carburetor. Here’s a list of items that you should consider cleaning, when cleaning your carb:
- Fuel lines
- Fuel filter
- Fuel tank
- Air filter
- Intake manifold
It’s highly recommended to clean the above mentioned parts thoroughly as well, as this will ensure that the air and fuel going into the carburetor are free from impurities.
In turn, this will ensure that your carburetor performs better, lasts longer and subsequently requires less on-going maintenance.