Besides possessing great technical and driving skills, go-kart racers take every single bit of information they can get their hands on, in order to consistently improve their lap times and understand how their go-kart is performing.
There are some great devices out there that feed racers with speed, distance, lap time, rpm and other information through speedometer, odometers and other types of data loggers. This information is valuable during your race and also for your post-race analysis.
Here is a quick summary for installing a speedometer on a go-kart:
- Mount Speedometer
- Install RPM Sensor
- Install Distance & Speed Calculator
- Install Temperature Sensor (Optional)
- Attached to Battery (If Applicable)
- Setup Your Speedometer
This guide will cover the end-to-end processing from finding the perfect location for the display to installing the speedometer on your go-kart. It’s important to mention that you should always take note of the information in the owner’s manual and follow those instructions carefully. Please use this guide for general knowledge and reference only.
If you plan to install a MyChron on your go-kart (regardless of which version or edition), then follow the MyChron Review and Installation Guide instead, as that is dedicated for this specific data logger.
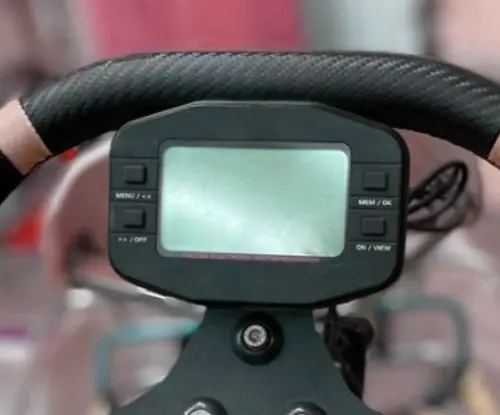
1. Mount Speedometer
The first thing that you’ll need to do is find a suitable location to mount your speedometer. Ideally you want to pick a position that is easily accessible to change the settings and also where you can clearly see the information during a race.
Take note that the speedometer should be placed in a position that when you look at it, your front view of the race track and other go-karts should be in your peripheral vision. If you place it somewhere that takes your focus off the track for too long, you’ll increase the risk of a potential accident.
Here are some suggestions for the best mounting locations:
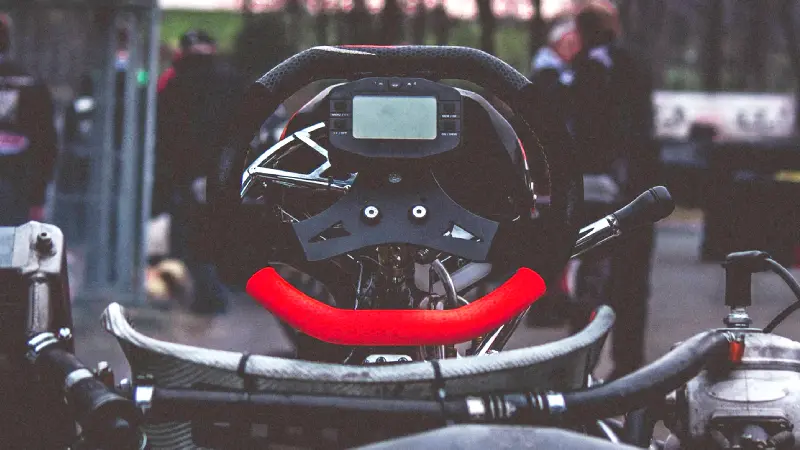
- On the Steering Wheel (Recommended): By far the best location to mount your speedometer. Here, it’s easily accessible and gives an unobstructed view. A short glance will give you all the information you need. Although it turns with the steering wheel, it shouldn’t bother you, as you shouldn’t be looking at it during corners, anyway.
- Behind the Steering Wheel: This location is suboptimal due to steering wheel obstruction. However, it’s possible if mounting it on the steering wheel is not an option for you. While it always stays in position and doesn’t rotate with the steering wheel, the viewability may be obstructed.
I don’t recommend mounting the speedometer anywhere on the frame or the body kit, such as the nassau panel, near the pedals or on either side of the driver’s seat. This is because these areas bring your focus away from the race track and can be a potential danger.
2. Install RPM Sensor
Most speedometers come with an RPM sensor, which measures how many revolutions your engine’s crankshaft is spinning per minute. While cars use more advanced technologies such as crankshaft position sensors, measuring RPMs on a go-kart is a little less sophisticated.
For go-karts, the RPM is measured through spark plug vibrations and triggers. Therefore, most go-kart speedometers come with a spark plug pulse sensor that measures these small vibrations to estimate the engine’s RPM.
To install the RPM sensor of the go-kart speedometer, you need to wrap the sensor around the spark plug lines (about an inch or two from the coil) a few times. Check your owner’s manual for the exact directions, as each pulse sensor is calibrated with a different sensitivity.
After you’ve done that, you’ll need to connect the sensor cable back into the speedometer. Ensure that your sensor is not wrapped around too loosely. Also, take note if the speedometer manufacturer recommends a specific position on the spark plug to wrap the sensor around.
3. Install Distance & Speed Calculator
Installing the distance sensor is perhaps the most complex task in installing a go-kart speedometer. Most speedometers collect distance data through a magnet and a sensor that are installed on one of your wheels.
You’ll need to install the sensor (together with the cable) on any non-moving part that can pick up the reading from the magnet. Here, I suggest using cable ties to secure the distance sensor onto the spindle or hub of your go-kart.
The magnet needs to be secured to the inner rim and doesn’t require you to hook up any cable, as it’s only used to trigger the sensor, every time the magnet passes it. Therefore, they need to be aligned correctly.
How To Set the Tire Measurements on Your Speedometer
In order for your speedometer to calculate the total distance your go-kart travels, it takes the readings from the sensor and the magnet. Every time that magnet passes that sensor it multiplies this by a specific distance.
Pro Tip: There are various calculations and data points that speedometers use, in order to calculate distance and speed of a go-kart. However, the most accurate way to do this is by using the circumference of the tire.
Most speedometers will let you enter the circumference of your tire, in order for it to calculate how many lengths of it your go-kart has traveled. You may refer to the illustration to see how to measure this on your go-kart. Below, you’ll find the corresponding formula if you need to calculate it.

Let’s say your rear tires are 10 x 4.50 - 5. The circumference of your tires is the height of your tires “10” times π (pi). This makes the circumference of your tires about 31.416”.
Feel free to read my extensive guide on how to read the tire sizes on go-karts, if you need more information or want to learn what each of the tire values means.
In essence, this means that every time the sensor picks up a reading from the magnet (after one complete tire rotation, your go-kart has traveled 31.416 inches. Take note that there are also various other ways to calibrate and set these values. Make sure to follow the instructions of the owner’s manual.
4. Install Temperature Sensor (Optional)
Not all go-kart speedometers come with temperature sensors, for two reasons. Firstly, they aren’t vital for racing and secondly, because there are various types of temperature sensors available. Therefore, most speedometer manufacturers opt not to include any of them.
However, if your speedometer kit comes with a temperature sensor make sure to install it correctly. Take note that temperature sensors are optional to install and are only required if you would like to read temperatures of your respective components and parts.
- Tire Temperature Sensor – Measures the surface temperature of your go-kart tires through an infrared sensor. Can be important to understand your tire prep and tire selection for races.
- Water Temperature Sensor – Measures the water temperature of your radiator. Installation of this sensor requires clipping it onto the radiator hose, in between the two clamps for an accurate reading.
- Exhaust Temperature Sensor – Measures the heat of your exhaust fumes. The heat sensor is placed near the tip of your exhaust pipe or muffler.
- Head Temperature Sensor – Measures the cylinder head temperature and gives an accurate reading if the combustion cycles run with optimal heat. Take note that this installation process is more complex.
5. Attached to Battery (Optional)
Most speedometers come with a lithium-ion battery back that can be replaced to recharged. This provides the device with enough power to run when your go-kart is in operation.
For speedometers that are not internally powered, you’ll have two options. You can either connect it to your engine (requires charging coils) or to a go-kart battery.
Most speedometers are compatible with 12V batteries and don’t consume much power. Some of these devices are also polar independent, meaning that you can hook the cables up to any end of your battery (check this in your instruction manual).
6. Setup Your Speedometer
Now that you have your go-kart speedometer installed it’s time to get it set up. It’s best to follow the manufacturer’s recommended settings that can be found in the instruction manual.
Here are some of the things that you should consider to setting up according to your preference, before your next race:
- Unit of Measurements (metric vs imperial)
- Wheel Size (to calibrate distance)
- Date & Time
- Time Formats
- Warning Ranges
That’s it, you’re all done! Congratulations and great job! Now, all that’s left is to take your go-kart for a spin and test out if the settings work well and if you have missed anything in the installation process.