Torque converters are one of the most popular types of transmission for off-road go-karts. I guess you already knew that, have decided to purchase one and you’re now looking for a way to install it. If the answer to the above statements is yes, then you’ve come to the right place.
Here’s a quick summary of how to install a torque converter on a go-kart:
- Lay Out Required Parts and Tools
- Assemble the Driven Pulley
- Mount the Plate to the Engine
- Assemble the Driver Pulley
In this article, I’ll show you how to install a go-kart torque converter in 4 easy-to-follow steps. To ensure that you have the right tools and parts available, you can refer to the list below.
Tools You’ll Need:
- 1 x Wrench (for the mounting screws)
- 1 x Wrench (for the shaft screw)
1. Lay Out Required Parts and Tools
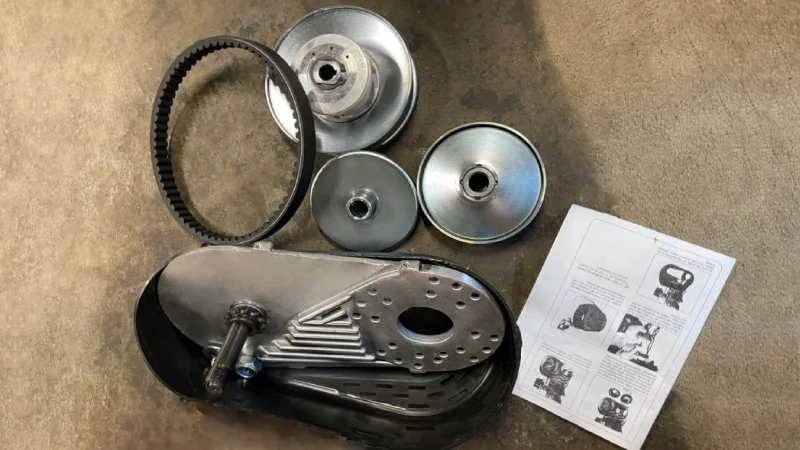
The first thing you’ll need to do is lay out all the parts that came in the torque converter kit. Make sure that no parts are missing. If you’re unsure what parts you need, you can use the parts list below for reference.
When installing the torque converter on your go-kart, make sure that you can easily access the engine. I recommend that you either dismount the engine from your kart and install the torque converter on a workbench or use a go-kart stand to work on your kart directly.
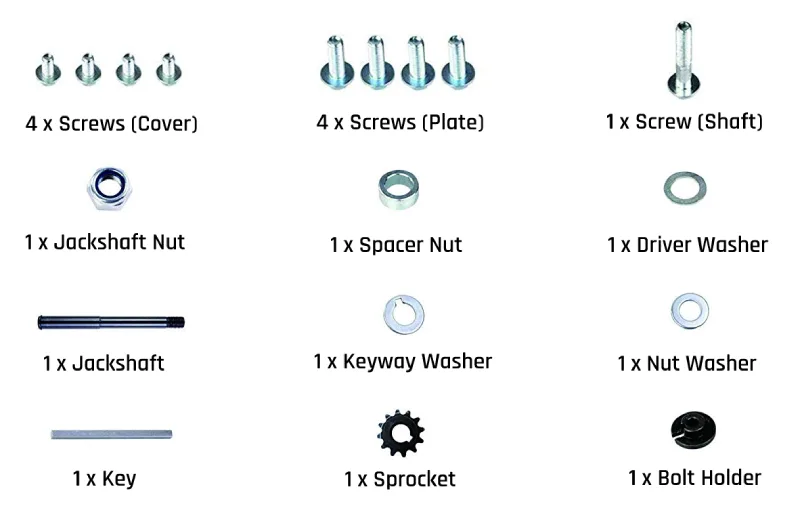
Torque Converter Parts:
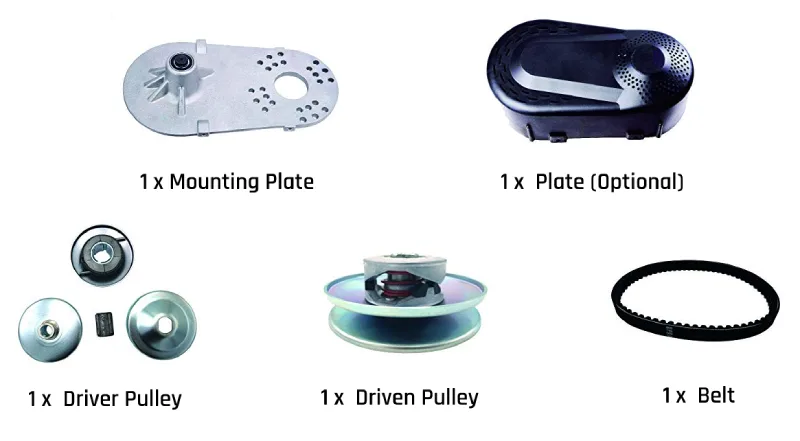
Torque Converter Hardware:
Also take this time to ensure that you have the right tools and that your sockets fit the bolts (torque converter kits may have different hardware). Lay them out along your parts and get ready for the installation process.
2. Assemble the Driven Pulley
Now it’s time to start assembling the first components of your torque converter. In this step, we will first assemble the driven pulley and then attach it to the mounting plate.
Parts to prepare for this step:
- 1 x Jackshaft
- 1 x Mounting plate
- 1 x Sprocket
- 1 x Keyway washer
- 1 x Driven pulley
- 1 x Nut washer
- 1 x Key
- 1 x Jackshaft nut
- 1 x Driver pulley
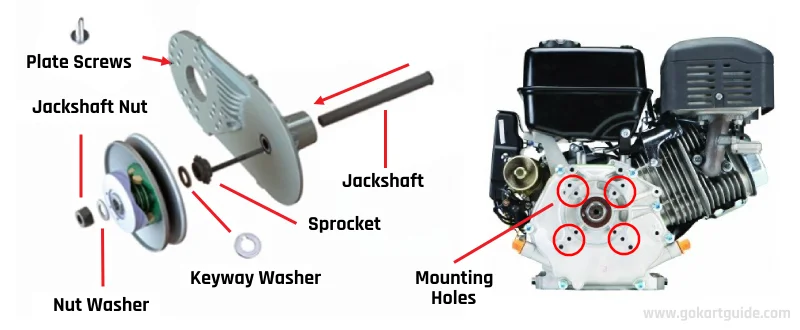
Firstly, slide the Jackshaft through the driven pulley bore on the mounting plate (it’s the smaller of the two bores). From the front side, slide the key through, together with the sprocket and the keyway washer. Take note that some torque converter kits may come with two sprockets. Pick the one that matches your chain size (more information in the go-kart chain size chart).
Once that is done, take the driven pulley and slide it over the Jackshaft. The driven pulley should rest against the front of the mounting plate. You should see the end of the jackshaft pointing out slightly.
To ensure it’s secured, place the nut washer on the front of the jackshaft so that it’s resting on the driven pulley. Finally, screw the jackshaft nut firmly and ensure that it’s tight! Use a torque wrench or an impact wrench for this.
3. Mount the Plate to the Engine
Now that the driven pulley is assembled to the mounting plate, you’ll need to install it onto the side of your go-kart engine. For this step, please refer to the image in the previous step. On the right side, you’ll see the side view of the engine for reference.
Parts to prepare for this step:
- 4 x Plate screws
Circled in red, you’ll be able to see a series of different mounting options (threaded inserts). Each engine and torque converter will have different compatibilities and for that reason you should select the mounting inserts that fit.
Simply take the 4 plate bolts and mount the torque converter (driven pulley with mounting plate and without the driver pulley yet) on the engine. The crankshaft should go through the plate bore. Make sure that the bolts are tightly screwed in and proceed to the next step.
4. Assemble the Driver Pulley
You’re almost done! You’ll now need to assemble the driver pulley to the torque converter and you’re good to go! This is the last step in this process and completing it is easy.
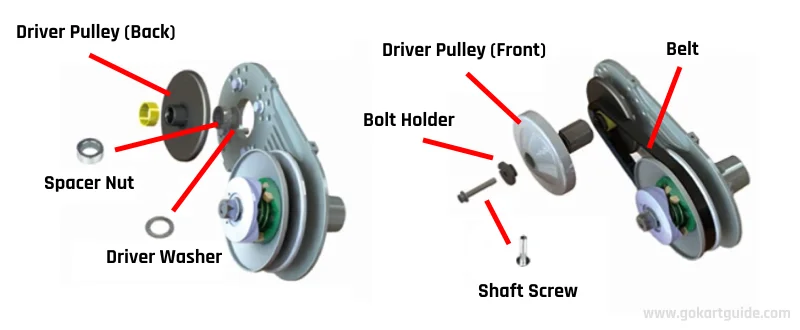
Parts to prepare for this step:
- 1 x Spacer nut
- 1 x Driver washer
- 1 x Bolt holder
- 1 x Shaft screw
- 1 x Driven pulley (front/back)
Let’s break this step down into two separate sections. Refer to the left side on the image above and start by placing the driver washer and spacer nut around the crankshaft of the engine.
Then, install the driver pulley (back) with the spacer ring so that it rests against the mounting plate. Take note not to install the front part of the driver pulley just yet.
Now we’ll get to the second section of the step and you’ll need to refer to the right side of the image. Proceed to install the belt next. Hook it around the driven pulley first, before putting it around the spacer nut of the driver pulley. Refer to the torque converter belt size chart if you need more information on go-kart belt sizes.
Next, install the front component of the driver pulley, together with the grooved bushing (it looks like a wide cogwheel). Once the driver pulley is installed, place the bolt holder into the small bore and securely tighten it using the shaft screw. For this, also use either a torque wrench or an impact wrench with a matching socket.
That’s it! You’ve just installed your torque converter! Just remember that you can always adjust the torque converter on your go-kart anytime later on. Lastly, turn the engine on and see if it works properly.
Cover Installation (Optional):
If your torque converter set comes with a cover, you should also install it. While torque converter covers are optional, they help protect the internal components, especially when off-road karting.
Install the cover by fastening two screws on the top of the cover and two at the bottom. The cover is screwed against the mounting plate of the torque converter and protects the inner components.